
Dry Stacked Stone Walls
for perfect drainage and warmth
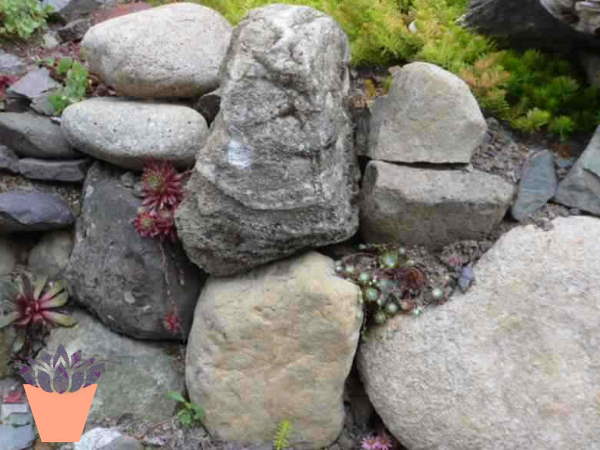
I have a failing – I love building rock retaining walls to plant my hardy succulent collection into.
The Sedum, Sempervivum and Jovibarba that are planted in my garden rock wall along the driveway are the happiest of all my hardy succulents, and I believe it’s partly because of the excellent drainage, the full sun exposure and the cool root run in the soil beneath the rocks.

Rock walls are perfect for planting with hardy succulents, which love the drainage…
I build stacked stone walls from the native rocks that occur on my site, but if you’re serious about stone wall construction, it is possible to get any kind of retaining wall stone from landscaping companies.
Ask if they will also deliver your selection, saving you and your vehicle some wear and tear.
Depending on what is locally available, try and choose the type of rock that forms flat slabs such as shale and granite. These tend not to decompose too quickly, and stand up better in high traffic areas.
Limestone, although it looks great in a dry stacked stone wall, is softer and more easily damaged by snow removal equipment and vehicles.

See if you can match the type of stone you have on your property – the finished rock retaining wall will blend in to the environment much more easily, seeming to have occurred naturally.
Start your stacked stone wall by determining the shape – a curved stone wall can be outlined by a garden hose.
Straight stone garden walls are best defined by a string line for perfect straightness.

It’s important to decide what soil type you’re dealing with. If you have soil with some gravel and a lot of sand, then you really don’t require much in the way of a footing.
If your soil is clay or extremely high in organic matter then excavate and replace some of the depth with some type of drainage material. Make sure the water has somewhere to go, or it will simply puddle at the base of the wall.
Don’t forget that highly organic or clay soil will soak up moisture, which will freeze and heave your beautiful garden rock wall and possibly completely destroy it.
Starting with good drainage, you’ll have much better success. It’s hard to be patient – you just want to get started on the stone wall construction phase – the fun part, but the preparation of the site is crucial.
So, here we go
Stone Wall Construction:
Your string line is in place, the rocks have been delivered to the site, and the footing is backfilled with coarse gravel for drainage and tamped down.
Stretch out the rocks that you’re going to use beside your work area.
Avoid having to turn them over too much, as they’ll be heavy.
Please use gloves and steel toed boots if your rocks are bigger than your head, as fingers or toes pinched between rocks really hurts, and can stop production in an instant.

Find several fairly flat rocks and place them in a row to start. I usually go about 2 meters, then lay the second layer.
Back fill each row with your hopefully fairly well draining soil that you excavated, or use some native soil mixed with coarse gravel.
This will be directly against the back face of the wall as you build it, for support. Tamp this down as you go to hold the rocks in place.
Say hello to my little friend:
Click a picture to open the gallery and see it in a larger size;


Continue layering your selected rocks. After a while, you will gain an intuitive knowledge about which stone will work next. I always aim to have a flat face to the outside of the wall, which gives a more uniform appearance.
Once you have three ‘courses’ or layers, you can start planting! Sempervivum don’t mind being inserted by the bare root clump right into the crevices – make sure there is contact between the roots and the soil.
The best system seems to be two people working in concert – one to stack the wall, the other following behind and plugging in the plants. This makes for an almost instantly completed xeric garden project.
Within a year or two, you’ll have a well established rock wall garden going, hopefully with the addition of some rock wall animals.
