At last; how to make Hypertufa

Everyone seems to be on the Hypertufa bandwagon these days.
If you haven’t tried it yet, now’s the time to start. You will never regret it.
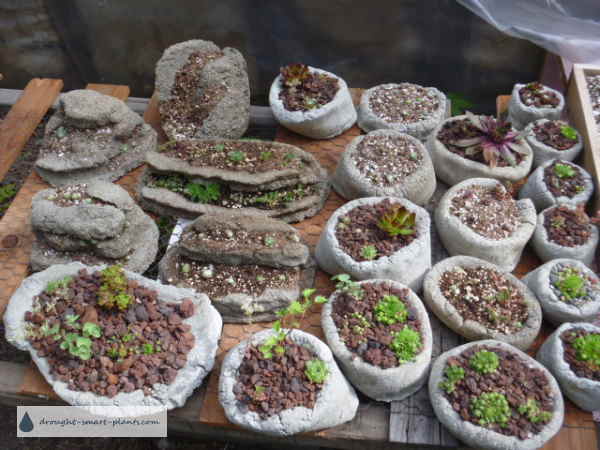
Although it takes a bit of preparation and assembling the ingredients, it’s so worth the effort to make some of these unique rustic pots.

Getting it right is sometimes a bit of trial and error because of the fact that it’s concrete, at the root.
That means that it’s a bit variable due to the fact that depending on where you are, some of the ingredients may not be available, and you will need to substitute others.
No matter how carefully you look for the exact same type and brand of the same ingredients there will always be some variation in how they’re prepared.


I’ve found this to be particularly true with peat moss, which is a natural product so there will always be some variability in the texture and contents.
Some that I’ve had is filled with sticks, which may not matter for growing plants, but it isn’t good for making hypertufa.
The basic ingredients are;
- Peat moss or substitute like coir fiber, hamster bedding, sawdust
- Portland cement powder (no substitute)
- Perlite (scoria, pumice or finely crushed lava rock)
These are generally mixed one part of each by volume, and then water is added. That’s it. There is no real secret ingredient, but there is a wealth of different ideas on what each ingredient does.
Portland cement is also dusty, and it definitely can be a problem, even in those that aren’t as sensitive – think about it; mixing cement powder with moisture causes it to harden – it will do this in your eyes, and your lungs.
Don’t take unnecessary risks, wear safety goggles and a mask to handle it in dry form.
Once it’s wet, it’s caustic, so you must wear gloves – surgical gloves give you protection from the pH, while still allowing good dexterity of your fingers.

Peat moss should be sieved to remove lumps and sticks, but it can have smallish lumps which just add more texture. In time, the peat moss will rot away, leaving small holes, just like real rocks in the mountains.
Plants love this, and thrive in the conditions of hypertufa.
I use a measuring scoop made from a laundry detergent jug. A coffee can or other type of scoop works fine too – the important thing is to make the scoops all the same (or as close as possible).

I mix the three ingredients dry in a dishwashing or bussing tub, but any shallow sturdy tray will do. It needs to be deep enough that you won’t be sloshing the mix over the sides, but shallow enough that it doesn’t strain your shoulders and back to mix.

Add water, a few cupfuls at a time. I use rainwater because it doesn’t contain any minerals or chemicals, and is plentiful around here.
I pull all the dry mix to one end of the tray or tub, then start adding the water at the other end, and mix it in until it’s consistent.
This makes sure that I don’t leave any parts dry, and it’s also easier to mix because you’re only mixing one small amount at a time.

Depending on what you’re making, you’re aiming for a consistency of mud pies which hold together when you make a ball.
Dropping it into the tub will show you if it needs more water; if it breaks apart, add a little more. If it drips from between your fingers it’s too moist; add more peat moss to soak it up.
You’ll gain confidence the more you do, and get a feel for it.
Here’s what you’ll need for this project – buy the supplies from Amazon; Measure out one part by volume of Peat moss,Perlite and Portland cement in a bussing bin or plastic cat litter box.
Mix carefully and thoroughly (make sure you use a dust mask and gloves to protect yourself) then add water to make a slurry.
See the short video on how to prepare the mix for your projects;
Now that you’ve mixed your hypertufa, it must rest for a few minutes.
I know, you thought that it would set up and dry immediately, right? By a ‘few minutes’ that means only about four or five, so you have just enough time to set up your first project, which could be sag pots, made by layering the mix into a piece of cloth or plastic hung over a box.
Molds can be almost anything; bowls from the thrift store or dollar store, ice cream buckets, boxes, or almost anything. Line your mold with thin dry cleaning plastic so the mix doesn’t stick to it and you can get it out.

Important; wash out your mixing tub and any other item that has the mix on it. It will never come off if you don’t rinse it off immediately.
I make each project on a ‘bat’ or small piece of plywood so I can move it without disturbing the piece. Although this is concrete, it’s extremely fragile at first.
Each piece must be covered to prevent it from drying out too quickly – grocery bags or other thin plastic is good for this.

After a day or so, you can start spraying the pieces with water to help them cure. Small pieces like pinch pots can be dunked right in a bucket of water and left there for a few days to a week.
Bigger pieces must be sprayed and the plastic covering replaced one or two times a day if it’s hot. The longer you can cure them, the hardier they’ll be.


