
Can You Trim Succulents? Absolutely!
As an Amazon Associate I earn from qualifying purchases.
Other links on this site may lead to other companies that I’m associated with.
Succulent plants, like any other plant, sometimes outgrow their space and require pruning or trimming. As they get older, they can get top heavy and fall over even in a large pot.

Any diseased part of a succulent plant should be removed, even though in most cases they have the ability to compartmentalize the damage so it doesn’t spread.
There are no special techniques for pruning succulent plants, other than using sharp tools to avoid any infection.
Pruning off the top of any plant will allow the other buds to grow – sometimes with impressive exuberance. This has the effect of making the plant bushier, as each lower bud grows to form a new smaller shoot. You can direct the growth by cutting just above a bud facing the right direction.
So go ahead, prune your succulents and don’t be afraid – most succulent plants are very forgiving and you can always propagate the pieces you cut off to make many more beautiful succulent plants.
There are several reasons why you should prune your collection of succulent plants:
- When they are leggy from not enough light exposure (keep them in a warm bright area for best growth);
- Or when you want to propagate them.
Many people dislike the look of a succulent plant that has a long corky stem with a ‘palm tree’ effect, the rosette of the plant forming a tuft on the top.
To make a new plant with the low growing rosette form that most collectors treasure, you must behead or decapitate your succulent plant.
It sounds harsh, I know, but you have to be cruel to be kind – and in this case, the plant will respond with a miracle – more baby plants that you can propagate lower down on the stem – so don’t discard it.
Look at the picture and follow the instructions below for exactly how to do it:
What tools will I need?
Most succulents are thin enough that a pair of scissors will cut through the stems, but occasionally you’ll need something a little sturdier (especially to behead Echeveria with their woody stems).
How do I Trim the Stems of Succulents?
Clip the stems of long overgrown succulents in the places indicated by the red lines:
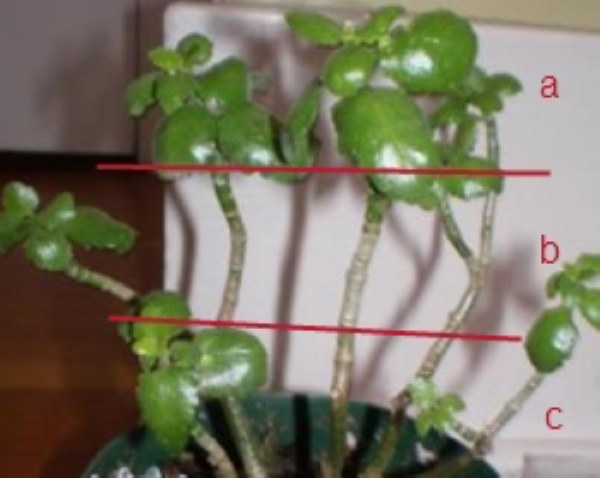
Leggy succulents need a haircut
a) These top rosettes will root quickly and give you many nicely shaped new plants for almost instant gratification – plant them right into a succulent planter for immediate impact.
b) The long sprawly stems are useful too – so don’t be too hasty to throw them away. Stick them (right side up of course) into some potting soil, and they’ll root and send up new growth.
c) Now you’re left with a pot of dead sticks – but are they really dead?
You’ll be amazed at the life left in these seemingly used up dregs.
Water carefully (not too much) until they show signs of new growth, then fertilize them, and stand back!
But where exactly do I cut the stem?
Here’s a diagram for where to make the cut – just above a set of leaves. Don’t leave a long stub of the stem, because it will just start to rot (and look weird).

For stems without leaves where it’s hard to see where the leaves used to be, just cut them and let them make the new shoots, then retrim them a bit shorter if necessary.
What happens next?
It’s hard to believe the miracle of new growth, those tiny shoots that will emerge. This is what it might look like;

Generally, the top most shoots will be the larger ones, those lower down a bit smaller. Those hidden, dormant buds are where the magic happens but only once the top of the plant is cut off.
Callous the Cuttings
There is one crucial point when you’re beheading the rosettes of succulent plants to propagate: the end of the cut beheaded part must be allowed to callous or dry to be able to form roots.
Then What? Propagating the Cuttings
I usually either let the cutting dry out, sometimes for a long time, after which it happily forms lots of thread like pink roots.
Otherwise, I put them in a communal flat with dry Sunshine Mix #4 or other well drained succulent soil. Simply place them on top of the soil, and the roots will find their own way down.
It sounds counter intuitive, as all cuttings have to have water – don’t they?
Succulent plants are the exception, and will root perfectly well without excess water.
After a couple of days to several weeks you can water – make sure your drench thoroughly, and then allow to dry out again.
If you spray only the surface of the soil close to the cutting, this encourages the roots to get started, but as soon as the succulent is rooted (tug gently on it to test this) you can water more thoroughly.
Pruning succulent plants to take cuttings is only one reason to prune – the other is to make them break new shoots from lower down on the stem by removing the top bud which secretes auxins.
What are the best tools for pruning?
The best tools are pruners, my preference is the Felco line which are bypass pruners, not anvil pruners. Anvil types can crush the stem, which invites disease in.
Check out this selection of Fiskars pruners from Amazon.com. These are hands down my favorite (and most reliable) cutting tools.
My other favorite pruning tools are Japanese bonsai scissors, which are slender enough to reach well into the plant. This makes it possible to snip off any of the growth you don’t want, while leaving the buds that you want to keep.
I usually sterilize the pruners between plants with Isopropyl alcohol. This is especially important to prevent transferring diseases from one plant to another if any of them are infected.
I sometimes use a weed whacker to cut back the dead flower heads of low growing creeping Sedum or stonecrop; works like a charm, but in most cases sharp scissors, pruners or a razor blade are best for more precise work.
Some of my favorite succulents are many of the beautiful Echeveria, Graptopetalum and Crassula, which benefit from the removal of long leggy growth by creating a bushier and more compact plant.
Special pruning techniques are needed to make a Crassula bonsai.

Japanese Bonsai Scissors
Pruning succulent plants is not difficult – try not to bruise the leaves as you behead your plant – some of my favorite propagation tools that are also used for pruning are a pair of Japanese bonsai scissors or a scalpel, as they can reach in without damaging the leaves.
The pieces you cut off in the process can be used for vegetative propagation such as cuttings.
Learn how to prune succulents the right way – it’s not that hard, honestly.
The number of times people ask me how to work up the nerve to cut that bedraggled, scraggly overgrown thing in their succulent plant collection, and I’m brutal – just chop off its head!
So, you’ve worked up the courage to take the scissors to your poor plant.
Now what?
First of all, take a good look at it in bright light, and see where you might be able to cut it off so that the cut is, first of all, above an outward facing leaf.
As all leaves protect a bud where new growth will emerge, this will create a cup shaped plant, ideal for giving each new branch some space.
This is a fundamental rule in every type of pruning, whether it’s an apple tree or a bonsai pine.
Here’s my thriving and healthy Senecio cylindrica, which offered to be my subject for showing you how to prune succulents:
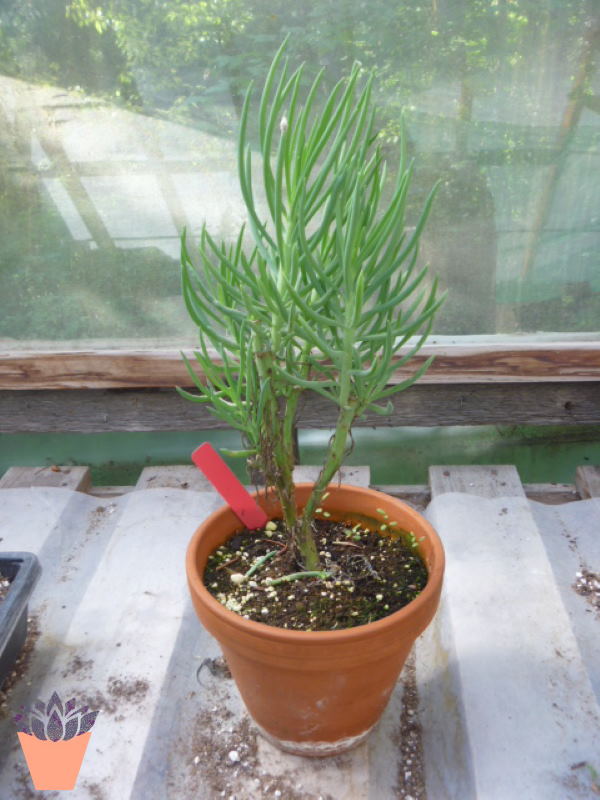
Senecio cylindrica are beautiful and easy to grow
You wouldn’t recognize this as the same plant that I pretty much neglected all winter under lights in a back bedroom.
It was totally dried out, and dessicated, and I actually wondered for a moment or two if I had killed it finally.
But no, it recovered after being outside in a semi shaded spot behind the house and getting some of the most beneficial natural treatment, rain fall.
I call this ‘putting it on neglect’ and it’s amazing how well it works for succulents.
Not fretting about killing off your plants does wonders for your stress level too!
As you may be able to see, some of the newest growth is actually thicker than the older growth.
This shows that it’s really happy, and it’s a good time to prune it.
Pruning plants that are in distress sometimes puts them over the edge and they’ll decline until they die.
Pruning a healthy, happy plant will only encourage it to bush out and grow some more, all things being equal, and some fertilizer is applied just after the appearance of new growth, and it is in bright enough light.
Other rules about pruning are to always remove dead, diseased or crossing growth, and to make sure each branch will have a bit of room around it.
In pruning apple trees, the advice is to make sure that a bird can fly between the branches, however, that’s not really applicable with succulents – a moth, maybe?
I also take the opportunity to check for bugs, remove any dead or shriveled leaves, and maybe add some lava rock mulch to cover the soil. Prettying it up can be just like you getting a haircut and a manicure – it changes your whole outlook.
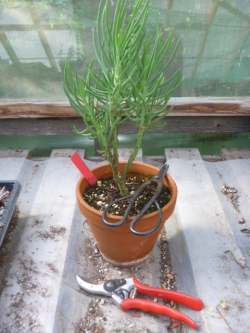

Sharp, clean pruning tools are essential
The result; five or six new cuttings, ready to callous
There, that wasn’t so difficult, now was it? Now I’ve got five or six new cuttings, which once they’ve calloused, will grow into lovely, lush new plants.
That’s the added bonus to pruning succulents. The aim of all this is to make the original plant more compact, healthier and with lots more new growth aimed outwards from the center.

New cuttings callousing right in the dry soil
I think a lot of times people are intimidated by pruning but really, the only way to learn how to do it is to do it.
Learning from seeing me do it won’t wrap your brain around the understanding of it, so get out there and prune a succulent plant or two; you’ll see what I mean.
Observe what happens when you cut a certain part off. See where the growth emerges, and soon you’ll be able to anticipate what the plant will look like after it starts to grow in again.
