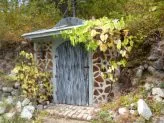
Earth Sheltered, Green Roofed, Cordwood Root Cellar
Glory Be, the root cellar was conceived because I wanted a place to put homegrown organic vegetables for winter storage.

I’m lying; I wanted a green roof – there, I’ve said it.
I also wanted to try cordwood, and making a funky door that I could try out a new painting technique.
It’s worked out very well for trialing and testing lots of different methods of creating a unique and fun structure.
The most intensive and frustrating part of the project was finding information and specifications for root cellar construction.
The criteria are simple; dry, or at least not really damp, and above freezing in the winter (preferably without the use of electricity) and maintaining a fairly low summer temperature, ideally below 15 degrees Celcius so that the drinks stay cold.

Using these few rules, I resorted to the ‘seat of the pants method of design for Glory Be.
I was also very interested to try out two alternative building methods; cordwood construction, and a green roof.
Luckily, there is more information out there on these techniques.
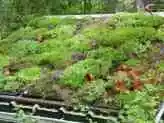
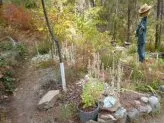
The roof was back-filled with between eight and ten inches of soil, and eventually planted with many different Sedum; I especially recommend these green roof Sedum.
For a different system of building your green roof, see how I built a modular green roof for a quick and economical option.
For full details of the construction of the earth sheltered root cellar see No Frills Build.
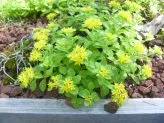
The Sedum Roof
Planting the Sedum roof was done over a couple of years, depending on if I had spare Sedum plugs or plants available.
There are many kinds of Stonecrop that have been trialed for use on green roofs in Europe to choose from.

The soil is about two inches (5 cm) of Sunshine mix over top of the several inches (15 cm) of native soil, and then the planted plugs are mulched with lava rock.
Once the plants get big enough to run into each other and fill in, it’s going to look great and in full bloom it will be spectacular. Update, summer 2013: it’s true.
There are many other green roof plants that will thrive in these challenging conditions including Andropogon gerardii, the big bluestem, and Ratabida pinnata, the Mexican hat which reseeds itself every year.
Other xeric plants are suitable too; look for those that have a fine netting of roots rather than a tap root, as there isn’t enough depth in the soil for tap rooted plants.
The temperature inside the earth sheltered root cellar on the hottest days of summer will get up to 17-20 degrees Celsius, and in the winter when outside temperatures can reach -25 degrees Celsius it’s kept about 4 degrees inside by the help of a 60 watt bulb.

As it turns out, it maintains the ideal temperature for keeping my worm farm for vermicomposting.
All things considered, Glory Be is a hit on all fronts. Visitors are fascinated by its hobbit house appearance.
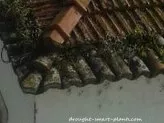
I also get frogs and crickets and the occasional alligator lizard living in the cool damp inside, so I have to watch I don’t crush them by accident.
The one in the picture has lived above the door for two years, and very casually moves a bit when I carefully open the door, and then settles down again in the same spot – he’s not giving up the best seat in the house!
I’m very satisfied with the way Glory Be turned out, and I highly recommend it as a fun project to build in any xeric garden.